How to Upload a Powerpoint With Narration Notes
You can record your PowerPoint presentation—or a unmarried slide—and capture vocalisation, ink gestures, and your video presence. When completed, information technology's like whatsoever other presentation. You lot can play information technology for your audition in a Slide Bear witness or you lot tin can relieve the presentation as a video file. So, instead of just "handing the deck" to someone, people can see your presentation with the passion and personality intact.
A new feature for Microsoft 365 was rolled out in early 2022. Exactly when your business has this feature is also based on when your admin distributes new features in Microsoft 365.
This article contains procedures for both the new experience and the classic experience:
-
New experience
-
Classic experience
New feel

Try it!
All recording tools are in theRecordtab in the ribbon, but you can outset by selecting theRecordpush.
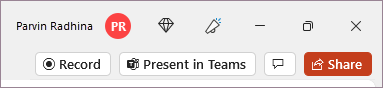
You lot can besides record by selecting one of the options in the Record section of the Record tab.

If you have notes in your presentation, they're turned into text at the pinnacle of the screen so yous can use them like a teleprompter as you tape.
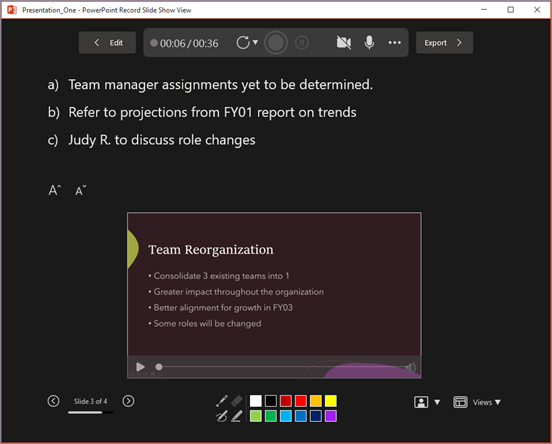
There are several options you tin use when you tape a presentation. You lot tin turn your camera and microphone on or off past selecting the icons at the meridian. To alter your camera or microphone, choose theSelect more options <···> icon.
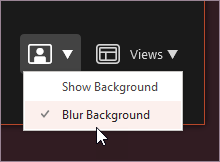
In theSelect the photographic camera mode card, y'all can select Show BackgroundorMistiness Background.
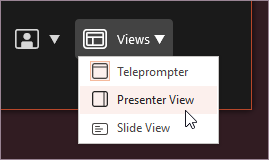
Y'all can also change the layout in theViews carte to switch betweenTeleprompter,Presenter View, orSlide View.
-
When y'all're prepare, selectStart recording and a inaugural will begin.
-
Use the onscreen light amplification by stimulated emission of radiation, colored pens, or highlighters in the tray beneath markup slides and it'll tape likewise.
-
To tape narration for a specific slide, use the previous or side by side arrows.
Note:Narration won't record during slide transitions so let those play first before you offset speaking.
-
Pausethe recording every bit needed or selectEndif yous're done.
-
To review the video, select thePlaypush. Non good enough? SelectRetake recording to record again.

-
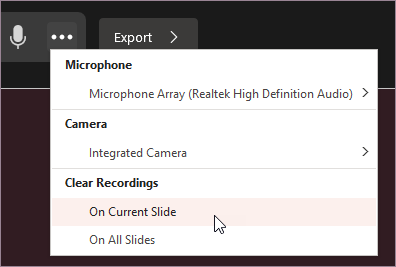
To articulate recordings, cull theSelect more choices icon and then got toClear Recordings > On Current Slide orOn All Slides. This will articulate narration, video, and any inking.
-
When yous're done, selectExport>Export Video.
-
After you successfully consign the video, y'all tin view the video by selecting View and share video.

At any time, you lot can return to your document past selecting theEditpush.
Want more than?
About Record in PowerPoint
Create a self-running presentation
Export or turn your presentation into a video
Archetype experience
-
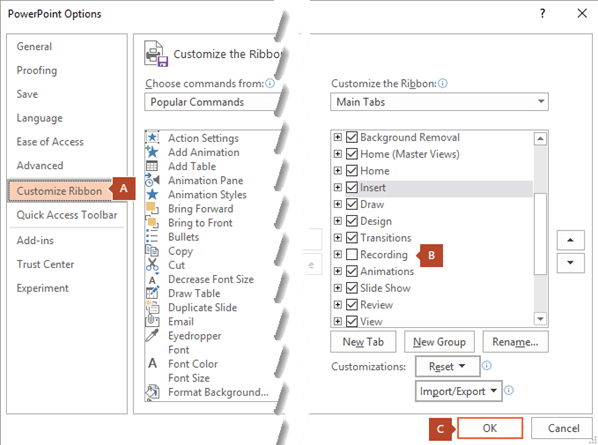
Turn on the Recording tab of the ribbon: On the File tab of the ribbon, clickOptions. In the Options dialog box, click the Customize Ribbon tab on the left. Then, in the right-hand box that lists the available ribbon tabs, select the Recording check box. Click OK.
-
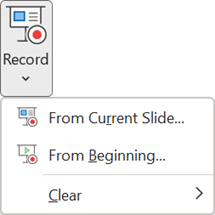
To get gear up to record, select Record on either the Recording tab or the Slide Show tab of the ribbon.
-
Clicking the upper half of the push button starts you on the current slide.
-
Clicking the lower half of the button gives you the option to start from the beginning or from the current slide.
(The Clear command deletes narrations or timings, so exist careful when yous utilise information technology. Clear is grayed out unless you accept previously recorded some slides.)
-
-
The slide show opens in the Recording window (which looks like to Presenter view), with buttons at the peak left for starting, pausing, and stopping the recording. Click the round, reddish button (or press R on your keyboard) when y'all are prepare to showtime the recording. A three-second countdown ensues, then the recording begins.

-
The current slide is shown in the main pane of the Recording window.
-
You can stop the recording whatsoever fourth dimension by pressing Alt+S on your keyboard.
-
Navigation arrows on either side of the current slide allow you to move to the previous and next slides.
-
PowerPoint for Microsoft 365 automatically records the time you spend on each slide, including any Animate text or objects steps that occur, and the apply of any triggers on each slide.
-
You can tape audio or video narration as you run through your presentation. The buttons at the lower-right corner of the window allow you to toggle on or off the microphone, camera, and camera preview:

If you use the pen, highlighter, or eraser, PowerPoint records those deportment for playback also.

If you re-record your narration (including audio and ink), PowerPoint erases your previously recorded narration (including sound and ink) earlier you first recording over again on the same slide.
Yous can also re-record by going to Slide Show >Tape.
-
-
Yous can choice a pointer tool (pen, eraser, or highlighter) from the array of tools just beneath the current slide. At that place are also colour selection boxes for changing the color of the ink. (Eraser is grayed out unless you lot have previously added ink to some slides.)
-
To end your recording, select the square Stop button (or press S on your keyboard).
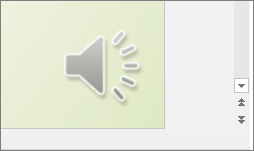
When you finish recording your narration, a small pic appears in the lower-right corner of the recorded slides. The moving picture is an sound icon, or, if the spider web camera was on during the recording, a still image from the webcam.
The recorded slide show timing is automatically saved. (In Slide Sorter view, the timings are listed beneath each slide.)
In this process, what you tape is embedded in each slide, and the recording tin be played dorsum in Slide Evidence. A video file is non created by this recording procedure. However, if y'all need one, yous can save your presentation as a video with a few extra steps.
Preview the recorded slide evidence
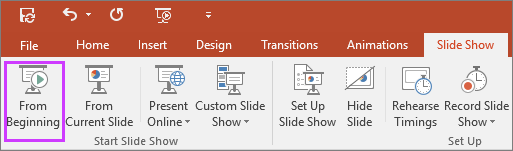
On the Slide Testify tab, click From Start or From Current Slide.
During playback, your animations, inking deportment, audio and video will play in sync.
Preview the recorded sound
In the Recording window, the triangular Play button near the top left corner lets yous preview the recording of the slide that currently has the focus in that window.

In Normal view, click the audio icon or picture in the lower-right corner of the slide, and then click Play. (When yous preview private audio in this way, y'all won't come across recorded animation or inking.)
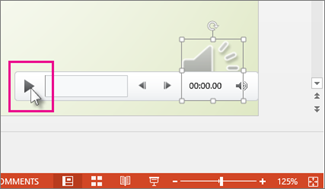
You lot tin can break playback while previewing the audio.
Gear up the slide timings manually
PowerPoint for Microsoft 365 automatically records your slide timings when you add narrations, or yous can manually set the slide timings to back-trail your narrations.
-
In Normal view, click the slide that you want to set the timing for.
-
On the Transitions tab, in the Timing group, under Advance Slide, select the After cheque box, and then enter the number of seconds that you want the slide to appear on the screen. Repeat the process for each slide that you lot desire to prepare the timing for.
If y'all want the side by side slide to appear either when you click the mouse or automatically after the number of seconds that you lot enter—whichever comes first—select both the On Mouse Click and the After check boxes.
You can use manual slide timings to the trim the end of a recorded slide segment. For example, if the end of a slide segment concludes with two seconds of unnecessary sound, simply set the timing for advancing to the next slide and then that it happens before the unnecessary audio. That manner y'all don't accept to re-tape the audio for that slide.
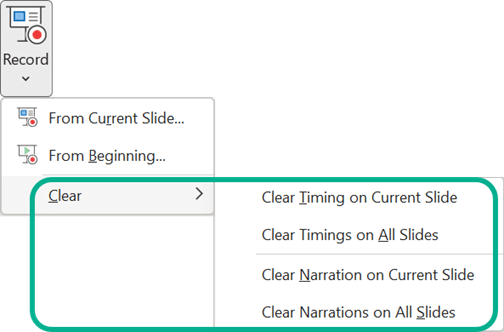
Delete timings or narration
The Articulate control is for deleting timings or narration from your recording that yous don't want or that you lot want to replace.
In the Recording window, the Clear command in the top margin of the window allows yous to:
-
Clear recordings on the electric current slide
-
Clear recordings on all slides
In Normal view, there are 4 different Clear commands that allow you to:
-
Delete the timings on the currently selected slide
-
Delete the timings on all slides at one time
-
Delete the narration on the currently selected slide
-
Delete the narration on all slides at once
-
If you practise not want to delete all the timings or narration in your presentation, open up a specific slide that has a timing or narration that yous practice desire to delete.
-
On the Recording tab of the PowerPoint for Microsoft 365 ribbon, on the Record Slide Evidence push button, click the downward arrow, signal to Articulate, and then choose the appropriate Articulate command for your situation.
Turn off timings or turn off narrations, and ink
After you've recorded your PowerPoint for Microsoft 365 presentation, whatever timings, gestures, and audio y'all performed are saved on the individual slides. But you can turn them all off if you want to view the slide bear witness without them:
-
To turn off recorded slide timings: On the Slide Show tab, clear the Use Timings box.
-
To turn off recorded narrations and ink: On the Slide Show tab, clear the Play Narrations box.
Publish the recording to share information technology with others
Once you've edited the recording to your satisfaction, you can make it bachelor to others by publishing to Microsoft Stream.
-
With the presentation open, on the Recording tab, select Publish to Stream.
-
Blazon a title and a description for the video.
-
Set other options, including whether you want others in your organisation to take permission to run across the video.
-
Select the Publish push button.
The upload process can accept several minutes, depending on the length of the video. A status bar at the bottom of the PowerPoint window tracks the progress, and PowerPoint shows a message when the upload is finished:
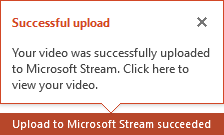
-
Click the bulletin to get directly to the video playback folio on Microsoft Stream.
Create closed captions
To make your video more than accessible by including airtight captions, cull from these options, which are described in dissever Help articles:
-
Manually write a closed caption file yourself
-
Get a airtight-caption file automatically generated past Microsoft Stream
Once you have a closed-explanation file, y'all can add it to your video file by using PowerPoint.
Tape a slide show
-
With your presentation open up, on the Slide Bear witness tab, click Tape Slide Show.
-
Clicking the upper half of the button starts you on the current slide.
-
Clicking the lower one-half of the push gives you the selection to start from the beginning or from the current slide.
(The Articulate command deletes narrations or timings, so be careful when yous employ it. Articulate is grayed out unless you lot have previously recorded some slides.)
-
-
In the Tape Slide Testify box, check or clear the boxes for your recording, and click Get-go Recording.

More near these options:
-
Slide and animation timings: PowerPoint automatically records the time you spend on each slide, including whatsoever blitheness steps that occur, and the use of any triggers on each slide.
-
Narrations, ink, and light amplification by stimulated emission of radiation pointer: Record your vocalisation as y'all run through your presentation. If you utilize the pen, highlighter, eraser, or laser arrow, PowerPoint records those for playback also.
Important: Pen, highlighter, and eraser recording are available only if you have the February 16, 2015 update for PowerPoint 2013 or a later version of PowerPoint installed. In earlier versions of PowerPoint, pen and highlighter strokes are saved as ink annotation shapes.
-
-
At the tiptop left corner of the window is the Recording toolbar, which you can use to:
-
Go to the side by side slide:

-
Pause the recording:

-
Re-tape the current slide:

If you re-record your narration (including sound, ink, and laser pointer), PowerPoint erases your previously recorded narration (including audio, ink, and laser pointer) when yous start recording again on the same slide.
Y'all can also re-record by going to Slide Prove > Tape Slide Testify.
-
-
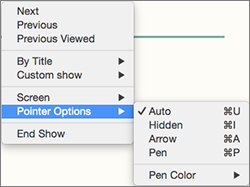
To use ink, eraser, or the laser pointer in your recording, correct-click the slide, click Arrow options, and pick your tool:
-
Laser Arrow
-
Pen
-
Highlighter
-
Eraser (This option is grayed out unless y'all have previously added ink to some slides.)
To change the color of the ink, click Ink Color.
-
-
To end your recording, correct-click the final slide, and click End Bear witness.
Tip:When you lot finish recording your narration, a audio icon appears in the lower-correct corner of each slide that has narration.
The recorded slide show timings are automatically saved. Timings are shown in Slide Sorter view merely beneath each slide.
In this process, what yous record is embedded in each slide, and the recording tin can exist played dorsum in Slide Evidence. A video file is not created past this recording process. However, if you want a video file, you lot can relieve your presentation as a video with a few extra steps.
Preview the recorded slide testify
On the Slide Show tab, click From Offset or From Current Slide.
During playback, your animations, inking deportment, laser pointer, audio and video play in sync.
Preview the recorded sound
In Normal view, click the audio icon in the lower-right corner of the slide, and then click Play.
Set the slide timings manually
PowerPoint automatically records your slide timings when you lot add narrations, or you can manually set the slide timings to accompany your narrations.
-
In Normal view, click the slide that yous want to fix the timing for.
-
On the Transitions tab, in the Timing grouping, nether Advance Slide, select the After check box, and then enter the number of seconds indicating how long the slide should appear on the screen. Repeat the process for each slide that you want to set the timing for.
Tip:If you want the next slide to appear either when yous click the mouse or automatically after the number of seconds that you enter—whichever comes first—select both the On Mouse Click and the After check boxes.
Delete timings or narration
The Clear control is for deleting timings or narration from your recording that you don't desire or that you desire to supervene upon. There are four different Clear commands that allow y'all to:
-
Delete the timings on the currently selected slide
-
Delete the timings on all slides at once
-
Delete the narration on the currently selected slide
-
Delete the narration on all slides at in one case
-
If you do not want to delete all the timings or narration in your presentation, open a specific slide that has a timing or narration that you do want to delete.
-
On the Slide Show tab of the PowerPoint ribbon, on the Tape Slide Evidence button, click the down pointer, point to Articulate, and so choose the appropriate Clear control for your situation.
Turn off timings or turn off narrations, ink, and laser pointer
After you lot've recorded your PowerPoint presentation, any timings, gestures, and sound you performed are saved on the individual slides. But you can turn them all off if you want to view the slide show without them:
-
To turn off recorded slide timings: On the Slide Show tab, articulate the Use Timings box.
-
To plow off recorded narrations, ink, and the light amplification by stimulated emission of radiation pointer: On the Slide Show tab, clear the Play Narrations box.
Run across besides
Plow your mouse into a laser arrow
Breathing text or objects
Turn your presentation into a video
Create a self-running presentation
Record your slide show
-
On theSlide Show tab, selectRecord Slide Show to start recording from your electric current slide.
-
Toggle video and audio options in the optionsdropdowns in the recording toolbar.

To record your narrations with audio only, click the video button
 to toggle the photographic camera off
  .
. -
Use therecord
 , intermission
  , and resume
  buttons to control narration and navigation recording.
Tip:Customize your Record Slide Show experience by resizing the next slide and notes pane.
-
After clicking thestop
 button to stop recording, employ theplay
  button to preview what you recorded on the current slide.
 -
If you would like to rerecord your slide, click thetrash tin
 push button on the left of the tape push to delete your existing recording, then click therecord button once more.
 -
One time you exit the Tape Slide Show feel with the Esc fundamental or by clickingTerminate show, you will see narration (sound/video) applied to your slide forth with the proper slide timings and ink animations.
Tip:Sound, video, and inking elements can all be resized and moved in edit view after recording.
Clear timings or narration
-
On theSlide Show tab, under Tape Slide Show, select Articulate, and so select i of the following: Articulate Timings on Current Slide, Articulate Timings on All Slides, Clear Narration on Current Slide, or Clear Narrations on All Slides.

Keyboard shortcuts during the recording process
| Task | Keyboard Shortcut |
| Advance to the next slide or animation | N Click Spacebar Correct Arrow Downwards Arrow Return Page Down |
| Return to the previous slide or animation | P Delete Left Pointer Up Arrow Page Up |
| Toggle screen blackout | B . (flow) |
| Toggle screen whiteout | Due west , (comma) |
| End slide prove | Esc Control+. (period) |
| Erase drawing on screen | E |
| Become to adjacent slide if hidden | H |
| Change pointer to pen | Command+P |
| Change pointer to arrow | Control+A |
| Hide pointer on mouse movement | CONTROL+H |
| Shortcut carte du jour | CONTROL+click |
Related data
Add, modify, or remove transitions between slides
Record audio in PowerPoint for Mac
Add or delete audio in your presentation
Save a presentation as a movie file or MP4
Prepare to record
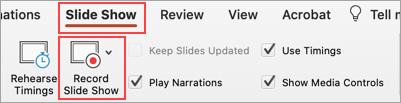
To begin, open the presentation you want and click the Slide Show tab.
Tip: If your presentation has a lot of slides, yous might notice information technology more convenient to piece of work in Slide Sorter view. Click View > Slide Sorter to try it out.
Here are some things to check before yous begin recording:
-
If y'all desire to tape only part of your slide deck, do 1 of the following before you begin:
-
Select the slides you don't want to include, and click Hide Slide.
OR
-
Click Custom Show > Custom Slide Show > + (add).

-
-
Use the Rehearse push button to change the timing between slides without affecting the narration or gestures you've already recorded.

-
Make sure your microphone is fix up correctly. On the Mac, go to System Preferences > Sound.
Record your slide prove
If you want to add narration or commentary to the slide prove, make certain your microphone is set upward and working.
To start recording:
-
Click the Slide Show tab, select the slide where you want the recording to brainstorm, and and so click Record Slide Show.

-
During recording, use Ctrl+click to access the recording commands that let you navigate through the slides, change cursors, or trigger screen blackouts or whiteouts.
-
Click End Show to end recording.
-
A Save dialog box appears. Click Yes to save your recording, or No if you lot desire to record it again.
Saving overwrites anything you've previously recorded. If you want to record some other slide show with the same ready of slides, save your presentation file with a dissimilar proper noun.
-
Click Play from Start to preview your recording.
Keyboard shortcuts during the recording process
Yous may want to print this list of keyboard shortcuts to refer to while you're recording:
| Task | Keyboard Shortcut |
| Advance to the next slide or animation | N Click Spacebar Correct Arrow Downward Pointer Return Page Down |
| Return to the previous slide or blitheness: | P Delete Left Arrow Up Arrow Page Up |
| Go a specific slide | Slide number + Enter |
| Toggle screen coma | B . (period) |
| Toggle screen whiteout | W , (comma) |
| Stop/Restart automatic show: | S |
| Cease slide show | Esc Command+. (menstruum) |
| Erase drawing on screen | E |
| Go to side by side slide if hidden | H |
| Change pointer to pen | Command+P |
| Change arrow to arrow | Command+A |
| Hide arrow on mouse move | Control+H |
| Shortcut bill of fare | CONTROL+click |
| Advance on mouse click (rehearsing but) | M |
Set playback options
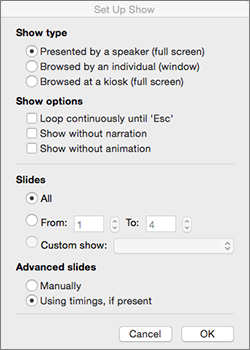
When yous've finished recording and are ready to distribute the presentation, click Set up up Slide Testify and choose the options that are right for your audience.
-
Show type Testify total screen or windowed.
-
Bear witness options Turn off narration or animations.
-
Slides Choose a subset of slides, or a Custom show if you've set one up.
-
Advance slides Ready this version of the slide prove so someone can page through information technology manually.
Related information
Add together, modify, or remove transitions between slides
Start the presentation and encounter your notes in Presenter view
Save a presentation as a movie file or MP4
We're sorry. PowerPoint for the web doesn't support recording a slide evidence.
Source: https://support.microsoft.com/en-us/office/record-a-slide-show-with-narration-and-slide-timings-0b9502c6-5f6c-40ae-b1e7-e47d8741161c
0 Response to "How to Upload a Powerpoint With Narration Notes"
Post a Comment